Congrats on your engagement and now you are planning your wedding. Are you looking for cost saving measures that don’t look too cheap but will in the long run save time, money and save your guests time and money too. The answer is, create your own wedding website! This saves time and money for you since you no longer have to purchase wedding invites, send out cards in the mail, ask for RSVP by mail, send along stamps for them to mail back, this is all very traditional wedding. If you want a more modern wedding, look to creating a website. Don’t know the first thing about creating a wedding website? Easy! Because no programming or coding skills is required. In fact, you’ll have your site up before you know it. Below I’ll show you how to get started on your site. At the end, all you need to do is add in your wedding details. What do you need to get started on your wedding website? You’ll need the following:
Techy Things you need for your Wedding Website: All explained further below
- Web hosting provider
- Domain Name .com (Maybe you and your partners name?)
- WordPress Installed
- WordPress Theme (Lily)
- Customize your Wedding Website with your wedding details
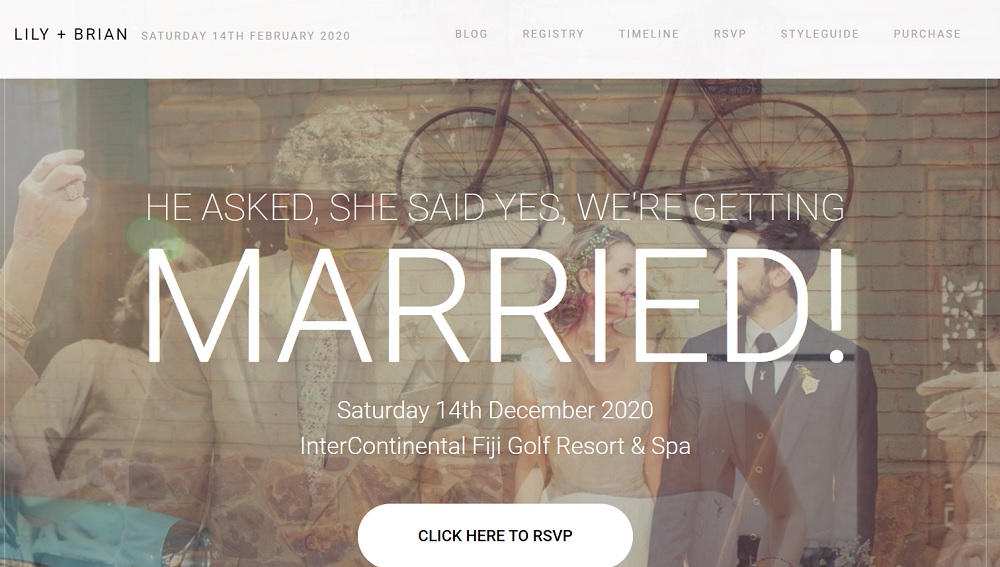
So I chose Lily as a wedding theme to use to help create your wedding website. This Wedding WordPress Theme has all the features you require including a timeline, countdown, RSVP form, image gallery, image slider, responsive layout, tons of layouts, easily customize colors, headers, footers etc. See screenshot below of Lily. Click here for more features of Lily Wedding WordPress Theme.
1.Webhosting Provider
I recommend using Blue Host as a webhosting provider. Webhosting is where you will store your website files. It’s also the connection to the outside world on the internet. Blue Host is a great webhosting provider because they have great support, have one click installs of WordPress, a free domain name for a year, and more (detailed here in my other post). Click here to get Blue Host.
2. Domain Name
You need a .com domain name so people can find your website online. If there’s no domain name, no one can find you. So think of a good name for your wedding website. You can choose a website name that combines both you and your partner, or maybe the year you are getting married etc. Many different options. As mentioned above, if you choose Blue Host, you get a domain name free for a year. Click here to see more details about Blue Host.
3. WordPress Installed
As mentioned above too, Blue Host offers one click installs of WordPress. It’s very easy and Bluehost has tons of support to help you install WordPress if you run into any problems. So if you purchase Blue Host as your webhosting, you got step 1, 2, and 3 covered! Click here for more details about Blue Host.
4. WordPress Theme – Lily
As mentioned above, using WordPress themes is the best way to create your wedding website. You will have a frontend which is where your wedding guests will see your site, and a backend where you can customize and add content to your website. The backend admin panel is a powerful tool that allows you to easily manage the header, footer, colors, fonts, layouts, menus, upload images, manage layouts and more. So much you can do in the admin panel which makes WordPress themes the best way to manage and create your wedding website. Lily has great features that allows you to have rotating images, countdown, image gallery, RSVP form, wedding accommodations, wedding registry, wedding party details and so much more. Lily also says that you can create your site in minutes with it’s one click demo import. This is a great them to use to create your wedding website. Click here for more details about Lily.
5. Customize with your Wedding Details
You don’t need any or all the wedding details on your site. You can set up a counter and allow your wedding guests to save the date and keep checking back for more details. I would create the site first. When you firm up more of your wedding venue details, slowly add in your wedding details. When you are ready, announce your wedding details to your family and friends via email, word of mouth or even a text message. That’s the easiest!
- Wedding Date
- Wedding Venue
- Wedding Meal options
- Engagement Photos
- Wedding Story/Timeline Details
- Wedding Party – Bridesmaids and Groomsmen Details
- Wedding Registry
- Instagram Hashtag
Those are some of the main things you would like to have on a wedding website. So your guests can get to know you and your partner and all the wedding details. Fill in your wedding details in your wedding website above! Check out my next post (link here) to see how much it will cost to create your wedding website with Lily.
Related posts: